How To Use Sales Navigator – Generate Leads in 2025
Many consider LinkedIn Sales Navigator as a top choice for growth, prospecting and even recruiting.
It offers the most recent list of potential leads and prospects, allowing you to identify highly-targeted contacts in minutes.
I’ve seen businesses struggle because they didn’t focus on the right people.
Sales Navigator is the perfect tool to generate more revenue by targeting the right leads and contacting them at the right time.
This complete guide will show you how to use Sales Navigator to its full potential. Get ready, you’re about to uncover a wealth of top-quality leads for your business. Also, if you would rather watch an in-depth video to follow along, we created a complete guide for you here:

What is Sales Navigator?
Sales Navigator is a tool provided by LinkedIn, designed to help not just sales teams, but any team in search of leads or prospects. It gives you access to a vast network of connections, letting you get in touch with decision makers across all industries.
Think of it as an advanced LinkedIn browsing platform. Sales Navigator takes your searching capabilities and your outreach to a whole new level, significantly outperforming regular searches.

How to Get LinkedIn Sales Navigator?
Sales Navigator isn’t free, it’s a premium LinkedIn service. To start using this tool, you need to sign up and subscribe.
There are various Sales Navigator plans, but usually, the “Core” option does the job, because the real value comes from searching the database. If you’re not sure about the best option for you, check out my article about different plans here:
LinkedIn Sales Navigator Pricing: What To Choose In 2025?
Are you wondering if Sales Navigator is good for your business and how much it will cost? Well, it depends…
Keep readingHow to use LinkedIn Sales Navigator: The Basics
When you open Sales Navigator, here’s what you’ll see:
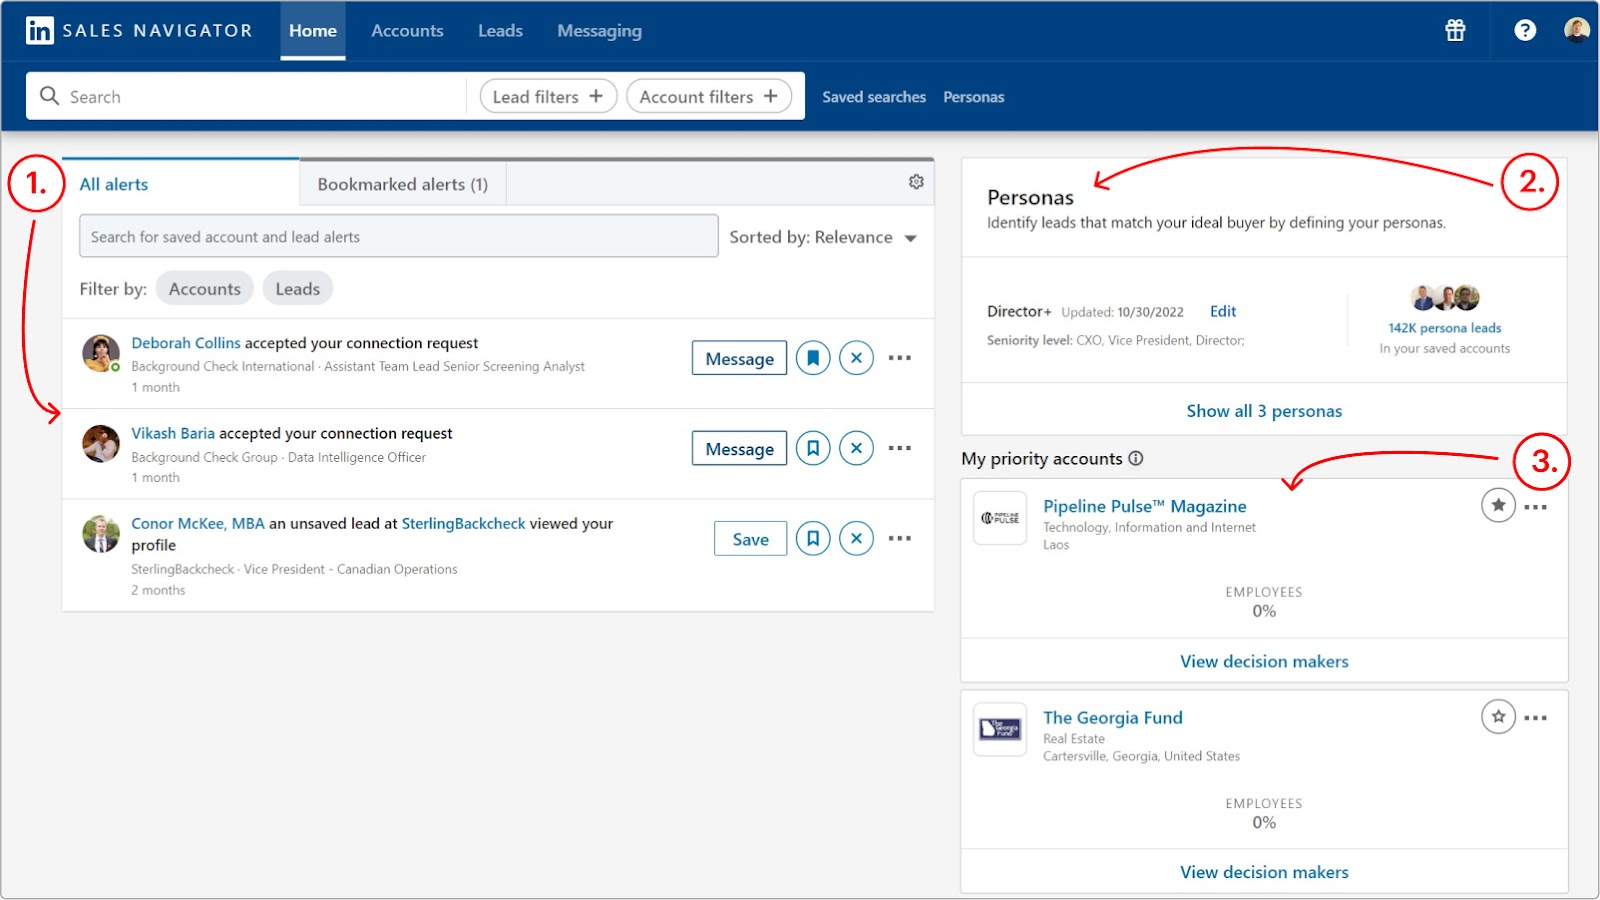
- Accounts alerts
- Personas
- Priority accounts
Let’s breakdown these points:
1. Accounts alerts
In Sales, timing is an important part. LinkedIn Sales Navigator is a tool that not only allow you to identify leads but also follow them by settings alerts.
You can use the search bar to filter alerts related to a specific account or leads.
Once you click on “Accounts” or “Leads” you’ll have access to additional filters to filter the more relevant alerts. Here are the filters I use :

2. Personas
In Sales Navigator, a persona is a combination of filters you set to find your ideal customer.
The “personas” feature allows you to save a combination of these filters:
- Function
- Seniority Level
- Current Job Title
- Geography
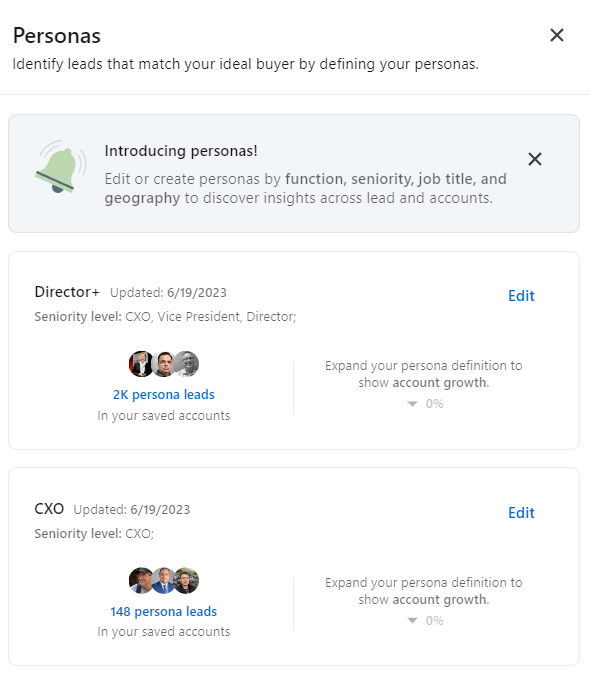
This is handy when you have different buyer personas and you want to be able to switch between them.
For example, you could search for people corresponding to a specific persona through your saved accounts by using the “workflow” filters. (We will talk about it very soon).

Priority accounts
These are the accounts you want to keep an eye on at all times or are currently working on. You can mark which accounts are “high-priority” using the star icon button to make them appear here.
If you don’t select any yourself, this will be filled with system-recommended accounts.
The Account Page
Firstly, on Sales Navigator, an ‘account‘ refers to a company’s LinkedIn profile.
Clicking on any account will take you to the Account page. Let’s briefly go over what’s shown on this page.

Not much to elaborate here. Let’s scroll to the account map.

The Sales Navigator Account map shows the important leads you should focus on in a certain account. Think of it as your dashboard for that company. It automatically fills up based on your usual activity. But you can also add leads, take them away, or change their Tier level.
Leads are organized in different tiers:
- Tier 1: C-Suite and decision makers
- Tier 2: Managers
- Tier 3: Employees
After you’ve created a map, you can share it with your team, making it handy to draft strategies on how to approach a particular account.
Next, we have the growth insights. Where the fun begins.

This data is really insightful. It helps you understand a company just by looking at its employee numbers.
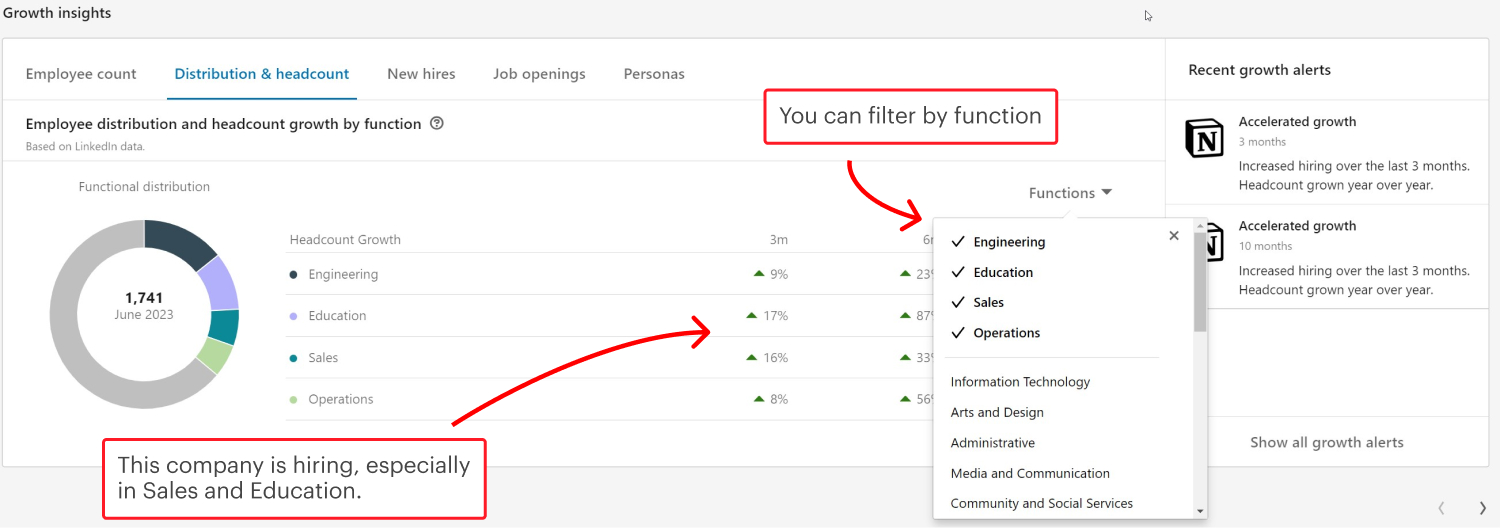
Take, for example, the “Distribution & Headcount” section. I noticed this company is hiring many people in the “customer success and support” department. This could mean they’re facing customer service issues as they grow. They might be considering a product to help solve these problems.
You can use the “Job openings” tab for the same purpose. If a company is hiring in a specific department, it might be trying to fix a problem, grow, or make a process more efficient.
Further down the page, you’ll find suggestions for similar accounts. It’s worth a look, but don’t expect too much.
At the bottom of the page, you’ll see account alerts again. Here, you can filter out less relevant updates like “this person posted an article”. This way, you can focus on important updates, like job changes.
Sales Navigator Lead Page
After exploring the Account page, you’ll likely find individuals who are important for your business and you will end up on a Sales Navigator Lead page.
Let’s breakdown the Lead page :

- At the top, you get an overview of the individual. It shows their name, title, current role, company, and more. Pretty straightforward.
- Next are the dynamic tags. For instance, this user has a LinkedIn Premium/Sales Navigator account, and their profile is “Open”. (This is very valuable, you’ll understand why very soon)
- On the right sidebar, you can save this person to a specific lead list or add notes to their profile. (I suggest doing this in your CRM instead, but it can be useful)
As you scroll down, you’ll come across the “Relationship” section. It showcases highlights of your connection with the lead, like shared connections or common groups.

This is useful if you’re trying to contact a particular lead. Getting introduced by a mutual connection can significantly boost your success rate.
The “Shared group” section can also be valuable. If you find that several relevant leads are in the same group, it could be a sign that others in that group might be useful leads. You can use this group as a lead search filter to find them.
Scrolling down, you’ll find a section similar to a regular LinkedIn profile. If you’ve linked your CRM, you can check if this person is already in your CRM. If they’re not, you can easily add them right there.
How to Use Sales Navigator to Generate Leads
This is where it gets interesting.
Sales Navigator stands out because of its superior search and filtering capabilities. Understanding these is crucial for getting the full potential of the tool.
To reach the search page, just click on the ‘Lead filters’ or ‘Account filters’ in the search bar on your homepage. Choose depending on whether you’re hunting for prospects or companies.

Sales Navigator Filters
Let’s take a minute to understand the filters, starting with the account filters. No need to memorize them, just go through them to get a sense of their power. You can always come back later if something isn’t clear.

- Annual Revenue: It’s self-reported, so it might not always be on point. If you decide to use it, I’d go for a wide range, so you don’t miss out on any good leads or accounts.
- Company Headcount: You’ll be using this one a lot. Whether a company is big or small changes the game, right? So, this filter helps you to target the right size.
- Company Headcount Growth: This is good if you’re looking for growing companies. I often set it to more than 20% growth. But remember, it only tracks growth over the past year.
- Headquarters Location: You can put your target countries here.
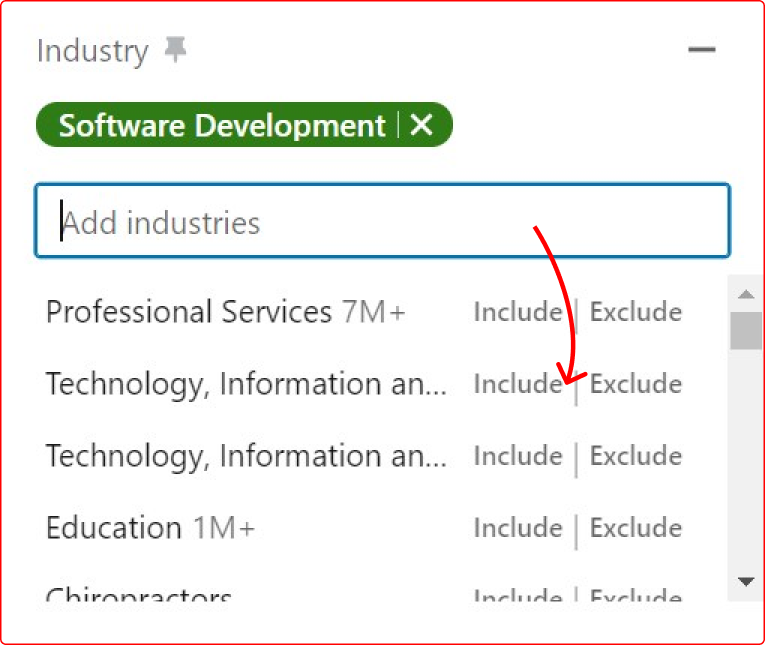
- Industry: You’ll probably use this a lot. Feel free to choose industries that are close to the one you target, since companies often misclassify themselves.
- Number of Followers: I don’t usually use this, but it might be useful in some industries.
- Department Headcount: This is really useful if you’re aiming at a specific department. For example, if you’re selling to companies with a strong sales department, you’ll want to use this.
- Department Headcount Growth: This is similar to the above, but for department growth. It’s useful if a specific department is your target.
- Fortune: This tells you if the company is a Fortune 500, Fortune 100 company, etc. I don’t usually use it, but you might find it useful.
- Technologies Used: The accuracy of this filter is hit-or-miss. If you need to target technologies, specialized tools like Builtwith could serve you better.
- Job Opportunities: Useful if you’re looking for companies that are hiring. The downside is that it shows all hiring, not just specific roles like sales.
- Recent Activities: This is very useful. Changes in senior leadership and funding events are important signals to pick up.
- Connection: It allows you to search accounts inside which you have 1st, 2nd, 3rd connections. Might be useful in specific cases, but not very interesting.
- Companies in CRM: Use this if your CRM is linked.
- Saved Accounts: This is useful once you start saving accounts.
- Additional Point: Accounts list: Use this to search within one of your account lists.
Now let’s go over the lead filters:

- Current company: It’s beneficial if you are looking to target individuals within a certain company. Otherwise, its usage is limited.
- Company headcount: Similar to the filter present in the Accounts section. However, this won’t be necessary if you have already sorted your accounts into a specific list.
- Past company: Just like the previous filter, but focusing on past companies instead.
- Company type: Could be quite helpful if you’re into a specific type of company, for instance, a non-profit organization.
- Company headquarters location: Company location.
- Function: The area they work in. I would almost always prioritize the Job Title filter as this can be very inaccurate.
- Current Job title: One of the most critical filters, you’ll be using it constantly. Ensure you include all potential variations of your target job title!
- Seniority level: Similar to the Function Filter, it’s not very needed if you’re clear on the job title you’re targeting.
- Past Job Title: Not really useful in my opinion.
- Years in current company: This can be helpful if your target is someone who has been working at a company for a specific period.
- Years in current position: Much like the previous filter.
- Geography: Even if you’ve filtered for the company’s location, this could be helpful as some companies are multinational.
- Industry: Heads up! This is the industry as listed on the user’s profile, not the company’s industry. It’s often off, so go with the company’s industry instead.
- First Name: Not needed unless you’re looking for a specific person.
- Last Name: Same as above, not needed unless you’re hunting for someone specific.
- Profile language: Useful if you want to ensure they speak a certain language.
- Years of experience: Self-explanatory.
- Groups: Useful if you aim to target folks in a specific LinkedIn group.
- School: Not very useful, unless you’re running a campaign centered around a particular school, or want to use it as personalization.
- Keyword in articles: Not recommended because very few post articles on LinkedIn, which eliminates almost all of your potential prospects.
- Following your company: Ideal for prospecting profiles that are already interested in your company.
- Viewed your profile recently: Ideal for prospecting profiles that are interested in you.
- Connection: Are they a 1st, 2nd, or 3rd-degree connection on LinkedIn? Are you part of the same group?
- Connection of: Allows you to search people you have common connection with.
- Past Colleague: This LinkedIn Sales Navigator filters searches prospects that you used to work with, based on employment history. Useless.
- Shared experiences: Same as above, but with experiences.
- Changed jobs: the changed jobs in the last 90 days’ filter can provide significant insights. People who’ve recently started new jobs are typically more open to experimenting with new tools.
- Posted on LinkedIn: Check this to see the people that recently posted on LinkedIn.
- Mentioned in news: Sames but with news mentions.
- Allows you to select a pre-registered Persona: This will automatically fill the job function, seniority, job title, and location. Very useful if you target different types of leads.
- Account lists: Very important. Once you’ve made an account list, you can use it here to find the right people in those companies.
- Lead lists: Incredibly handy once you start organizing your leads into different lists. This will help you form relevant sub-lists and exclude people you haven’t contacted yet.
- People in CRM: Can be helpful if your CRM is synced.
- People you interacted with: Use this feature to exclude those you’ve already interacted with, either by viewing their profiles or reaching out to them directly.
- Saved leads and accounts: It’s quite clear, isn’t it?
While many of these filters are primarily used to narrow down your search, they can also be applied to exclude certain parameters. For instance, if you want to include all industries except one, you can use the filter to exclude that specific industry from your search.
If you need a more in-depth video to walk you through step-by-step on using Sales Navigator for lead generation, watch this tutorial:
Boolean Search
The most important thing to keep in mind when generating leads on LinkedIn is that the more you target your leads, the simpler your work becomes later on.
Boolean search is a type of search allowing users to combine filters and keywords with operators such as AND, NOT and OR to produce more relevant results.
Boolean can be used in keywords search bar and some filters like “job title”.
If you have a good and precise ICP, using boolean search will help you shrink the results to get only the golden juice.
The good news? It’s really simple to master:
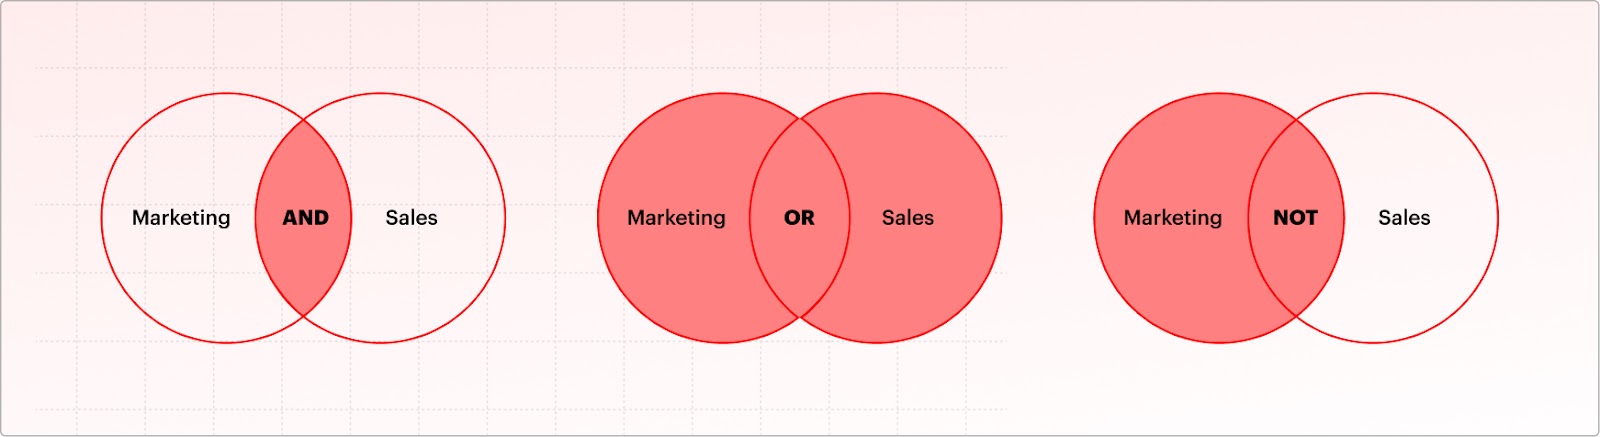
AND:
Searching “Sales” AND “Strategy” will show results that have both “Sales” and “Strategy.”
OR:
Searching “Marketing” OR “Branding” will show results with “Marketing”, “Branding”, or both.
NOT:
Searching “Manager” NOT “Strategy” will show results about “Manager” but nothing about “Strategy.”
Parentheses ( ):
For example, searching (Sales OR Branding) AND “Marketing” gets results with “Marketing” and either “Sales” or “Branding.”
On LinkedIn Sales Navigator, a search like “Manager AND (Marketing OR Branding) AND (Sales NOT Retail)” helps pinpoint managers in Marketing or Branding who are involved in Sales but not in Retail.
Few examples:

Important :
When your search term contains a space, it’s crucial to enclose it in quotation marks. Otherwise, it will default to “AND”, which may not deliver the results you’re after.
For example, if you type ‘product manager’, it will be equivalent to ‘product AND manager’. However, what you’re trying to find is the specific profile with the job title ‘product manager’. In such cases, you need to type it as “product manager”, with the quotes included in the search.
For a deeper understanding of LinkedIn Boolean searches, I recommend this short LinkedIn article.
LinkedIn Sales Navigator Best Practices
By now, you likely have a good understanding of Sales Navigator and can start your lead generation/outreach/recruitment. However, to rise to the top 10% of lead generation experts, you need to go a step further. Let’s explore LinkedIn Sales Navigator best practices.
Once you master these 6 tips, LinkedIn Sales Navigator will have no secrets for you.
1) The Power of InMails
When it comes to initiating a business conversation on LinkedIn, you have 2 options :
Sending Regular messages or using InMails.
With LinkedIn InMails, you gain the ability to send messages directly to any user on the platform without having to establish a connection first.
InMails are one of the most powerful features of LinkedIn Sales Navigator, so I wrote a complete guide about it. Click below to learn how to send more InMails and maximize their impact. (It’s significantly shorter than this one, I promise)

What is InMail on Linkedin? The Complete Guide 2023
When initiating a business conversation on LinkedIn, you have two options: sending regular messages or using InMails. What does InMail…
Keep reading2) Exporting From Sales Navigator
Now that you know how to make a perfect search, you might want to accelerate your growth, but as you probably know, LinkedIn limits your connections and InMails, and doesn’t allow exporting your search results.
Picture this: Bypassing LinkedIn’s limitations and reaching out to thousands of carefully selected leads. Sounds amazing, doesn’t it?
Well it’s possible. We created a chrome extension to export your sales Navigator search with verified emails and data in order to perform your cold emailing outside of LinkedIn. Here’s a video of the process:
Very straightforward, isn’t it?
Oh and it’s free. It also works on any linkedin profile. (and basically everywhere on the internet)
3) Saved Search
Saving searches on Sales Navigator is a powerful yet often overlooked strategy. This is your golden opportunity!
The goal is to save searches linked to time-sensitive events so you can receive alerts and take immediate action.
For example:
- In your lead search: Save a search using the filter “Changed jobs in the last 90 days” (along with your other filters). This approach allows you to get instant updates when, for instance, a new hire steps into a role you’re targeting.
- In your account search: Although the filter “Funding event in the past 12 months” may seem outdated, saving this search will give you immediate updates about any relevant
funding events.
4) The Art of Making Lists
Lists are invaluable tools for segmenting your data and should be a go-to strategy in your workflow. With well-structured lists, your searches for leads and accounts become significantly simpler. You can take advantage of the “Leads lists” and “Accounts lists” filters we’ve discussed earlier to curate highly relevant searches.
A smart technique is to create new lists based on existing ones: Begin by constructing a broad list, then use this list in combination with additional filters to refine it further. By the end of this process, you’ll have an array of neatly segmented lists at your disposal, plus master lists if needed for easily crafting new segments.
5) Sending Unlimited InMails
InMails are a crucial tool on LinkedIn, allowing you to message any user directly without needing to connect first. Plus, InMails have a high response rate, making them incredibly useful.
However, you might be worried about your limited InMail capacity. But did you know that you can send InMails for free? If the user you want to contact has the “Open Profile” feature turned on, you can send them an InMail at no cost.
The problem is, there’s no “Open Profile” filter on Sales Navigator. Without checking each profile individually to see if it’s “Open,” finding these users can be a challenge.
This is where Prospeo’s Sales Navigator extractor comes in. With our extension, you can filter your exported list by “Open,” finding every profile you can message without using InMail credits.
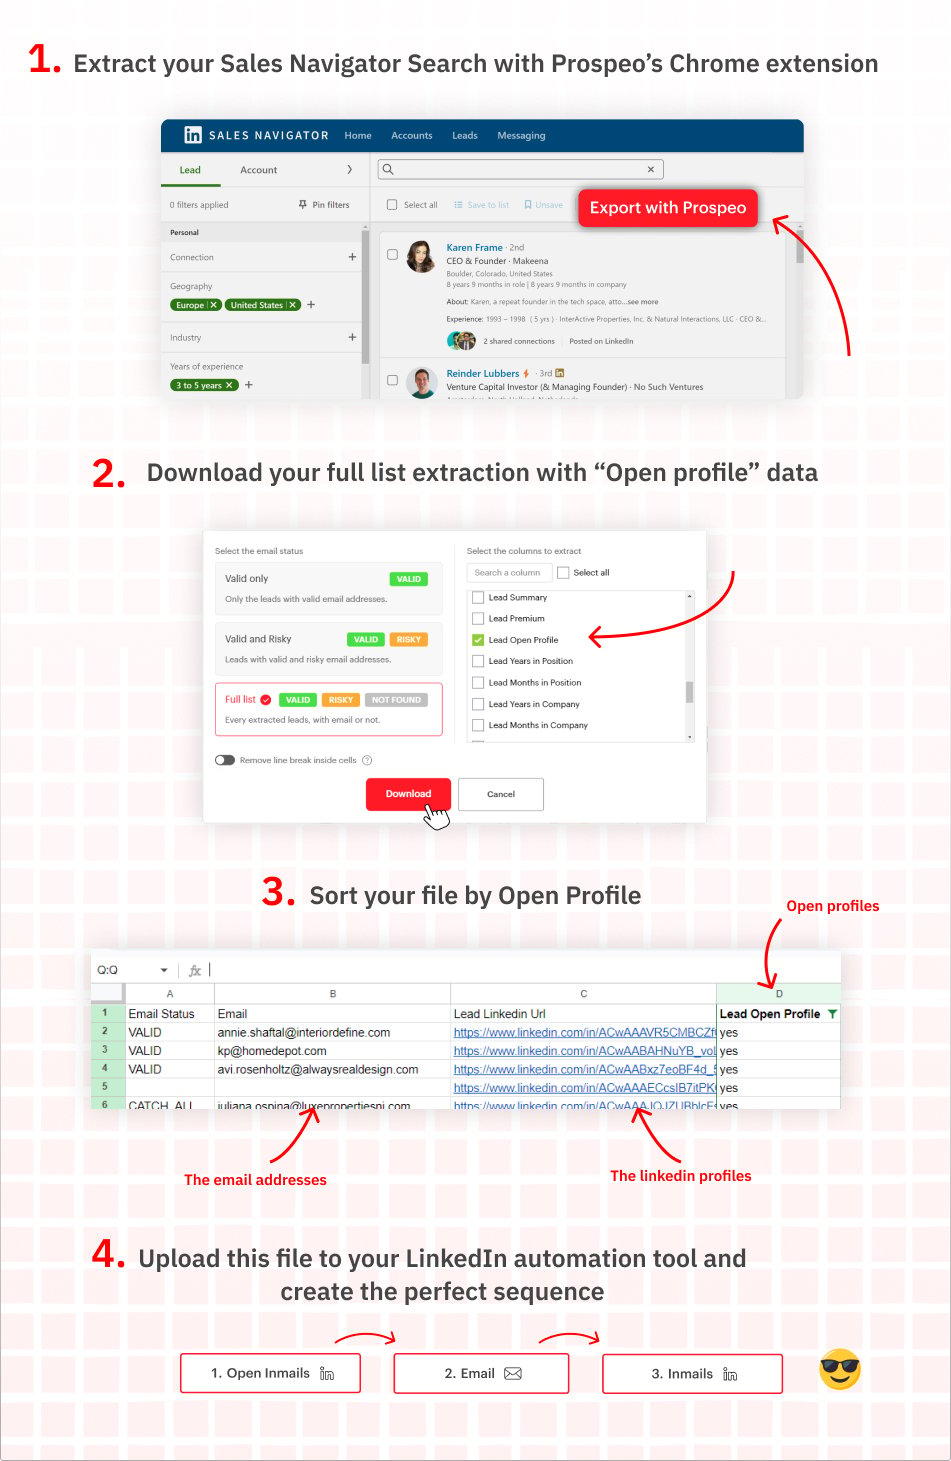
Remember, LinkedIn gives back your InMail credits when the recipient replies to your InMail, making your InMail strategy even more cost-effective!
For more tips and good practices, check out my InMails Guide.
6) Maintaining a Blacklist
Make sure you don’t send messages to the wrong people. It’s bad for your image if you send a standard message to current customers, competitors, or important clients who need a more personalized touch.
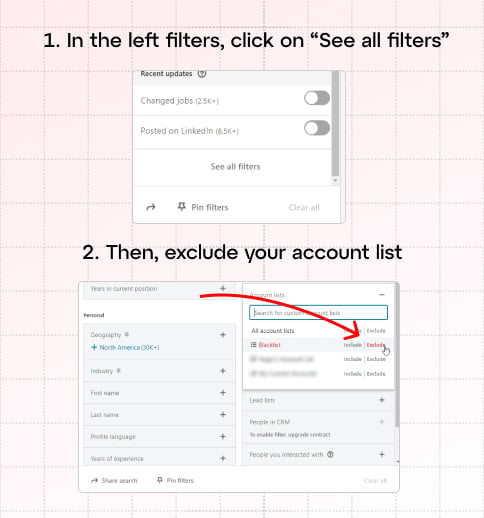
To make an exclusion list:
- Go to account search.
- Find the account filters button next to the lead filters.
- Add names of competitors, important clients you’re not ready to talk to, and current clients. It might take some time, but it’s important.
- Group these names and name this group “Blacklist.”
Then, go back to lead search. Click “saved lead searches” and pick an existing search or make a new one. Add your ‘Blacklist’ to the section of accounts you want to leave out.
To avoid messaging the same person twice, leave out leads you’ve already talked to. Use the “People you interacted with” filter in Workflow.
Bonus: Creating an Account List via CSV Upload
This feature only available for Sales Navigator Advanced and Advanced Plus
If you have a list of accounts saved in another location, maybe in your CRM, and you’re looking to import it in Sales Navigator, you’re in luck. Sales Navigator Advanced allows direct uploads of CSV files containing account lists. Below is a step-by-step guide on how to do this:

- Go to ‘Accounts’ > ‘Create account list’ and choose ‘Upload accounts from CSV’.
- Upload your CSV and match the column headers with LinkedIn’s fields.
- Name your list and hit ‘Finish’.
- Ensure the CSV is in the correct format and has an account name column.
Frequently Asked Questions About Using Sales Navigator
1. What is the best way to use Sales Navigator for lead generation?
Sales Navigator is most effective when you use advanced search filters, lead lists, and alerts to track potential buyers. You can also use Buyer Intent Signals to engage with leads at the right time. For a complete breakdown of strategies, watch this in-depth video.
2. How much does Sales Navigator cost?
Sales Navigator offers three pricing tiers (all prices are listed in US Dollars):
- Core: $99.99/month
- Advanced: $179.99/month
- Advanced Plus: Starts at $1,600/month
For a detailed comparison of features and pricing, check out our guide on LinkedIn Sales Navigator plans.
3. Can I export leads from Sales Navigator?
Sales Navigator does not have a built-in export feature. However, you can use Prospeo’s Chrome extension to extract leads with verified emails and 40+ data points, making it easy to import them into your CRM or outreach tool.
4. Does Sales Navigator provide email addresses?
No, LinkedIn does not display emails for most profiles. If you need verified work emails, you can use Prospeo to extract them directly from Sales Navigator searches and lists.
5. What are Buyer Intent Signals in Sales Navigator?
Buyer Intent Signals notify you when prospects engage with your company on LinkedIn. These insights help you prioritize leads who are already showing interest in your business.
6. Can I send unlimited InMails with Sales Navigator?
Sales Navigator provides a maximum of 50 InMail credits per month, but you can send free InMails to users with Open Profiles. For other ways to bypass the InMail limit, check out this in-depth video:
7. Does Sales Navigator integrate with CRMs?
Yes, but only the Advanced Plus plan offers direct CRM integration with Salesforce, HubSpot, and Dynamics 365. If you’re on a lower plan, you can export leads with Prospeo and manually import them into your CRM.
8. Can I cancel my Sales Navigator subscription?
Yes, you can cancel at any time, and your subscription will remain active until the end of your billing cycle.