How to Set Up DKIM in Office 365 (And Fix Every Error That Follows)
You just clicked "Enable" on the DKIM page in Microsoft Defender, and it threw an error about CNAME records not existing. Relax - you didn't break anything. That error is the setup process. Microsoft shows you the DNS records you need by failing first, which is a bizarre design choice that's confused admins for years. We've walked dozens of tenants through this, and the same five errors come up every single time. Let's fix all of them.
What You Need (Quick Version)
- Go to
security.microsoft.com/dkimv2, click your domain, click Enable - the error that appears is your CNAME values. Publish them exactly as shown. - If the CNAME targets don't end in
.com, that's correct. Microsoft's newer format ends in.dkim.mail.microsoft. - Wait up to 48 hours for DNS propagation, then re-enable. Verify with
nslookupor MXToolbox.
Enable DKIM via Microsoft Defender
Make sure your custom domain is added to Microsoft 365 and you have DNS admin access. Older management pages like https://protection.office.com/dkimv2 still exist, but the Defender portal at security.microsoft.com/dkimv2 is the authoritative source. Always use the values Defender gives you - not what some blog post from 2022 says.
If you’re also tightening up your overall email deliverability, DKIM is one of the first “must-do” steps.
Here's the process:
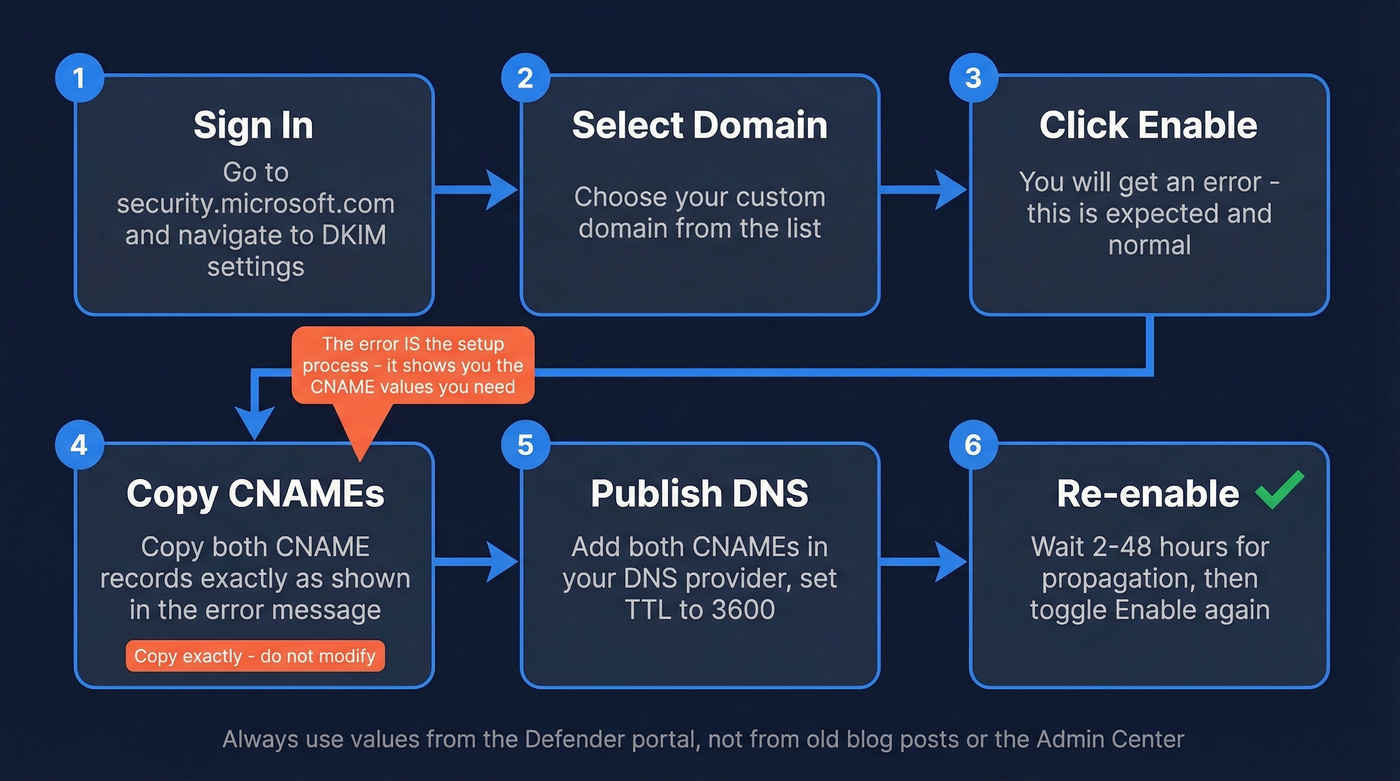
- Sign into
security.microsoft.comand navigate to Email & collaboration > Policies & rules > Threat policies > Email authentication settings > DKIM. - Select your custom domain.
- Toggle Enable. You'll get:
CNAME record does not exist for this config. Please publish the following two CNAME records first. - Copy both CNAME records exactly. Here's what the old and new formats look like:
Old format (targets ending in .onmicrosoft.com):
[selector1._domainkey](https://learn.microsoft.com/en-us/defender-office-365/email-authentication-dkim-configure)  →  selector1-contoso-com._domainkey.contoso.onmicrosoft.com
selector2._domainkey  →  selector2-contoso-com._domainkey.contoso.onmicrosoft.com
New format (targets ending in .dkim.mail.microsoft):
selector1._domainkey  →  selector1-contoso-com._domainkey.contoso.dkim.mail.microsoft
selector2._domainkey  →  selector2-contoso-com._domainkey.contoso.dkim.mail.microsoft
- Publish both CNAMEs in your DNS provider. Set TTL to 3600 (or your provider's default). Watch for trailing dots - some providers auto-append your zone, which can double the hostname.
- Wait for propagation, then return to Defender and toggle Enable again.
Admin Center vs. Defender disagreement: We've seen the Admin Center DNS wizard and the Defender DKIM page show completely different CNAME targets for the same domain. Trust the Defender page. Publish exactly what it gives you, character for character.
Verify Your DKIM Record Is Working
Once you've re-enabled DKIM in Defender without errors, confirm it's actually signing outbound mail.
Command line:
nslookup -type=cname selector1._domainkey.yourdomain.com
If it resolves to your published CNAME target, DNS is correct. You can also run your domain through EasyDMARC's DKIM lookup or MXToolbox's DKIM checker.
If you want a deeper walkthrough of validation methods (headers, tools, and test sends), see our guide on how to verify DKIM is working.
The real test: Send an email to a Gmail account, open it, click the three dots, then Show original. Look for dkim=pass in the Authentication-Results header. That's your confirmation - everything else is just checking plumbing.
Why This Matters for DMARC
DKIM alone doesn't do much without DMARC. DMARC passes if either aligned SPF or aligned DKIM passes, where "aligned" means the domain in the authentication check matches your From address domain.
If you want the full “what counts as alignment” breakdown (relaxed vs strict, SPF vs DKIM), this is covered in our DMARC alignment guide.
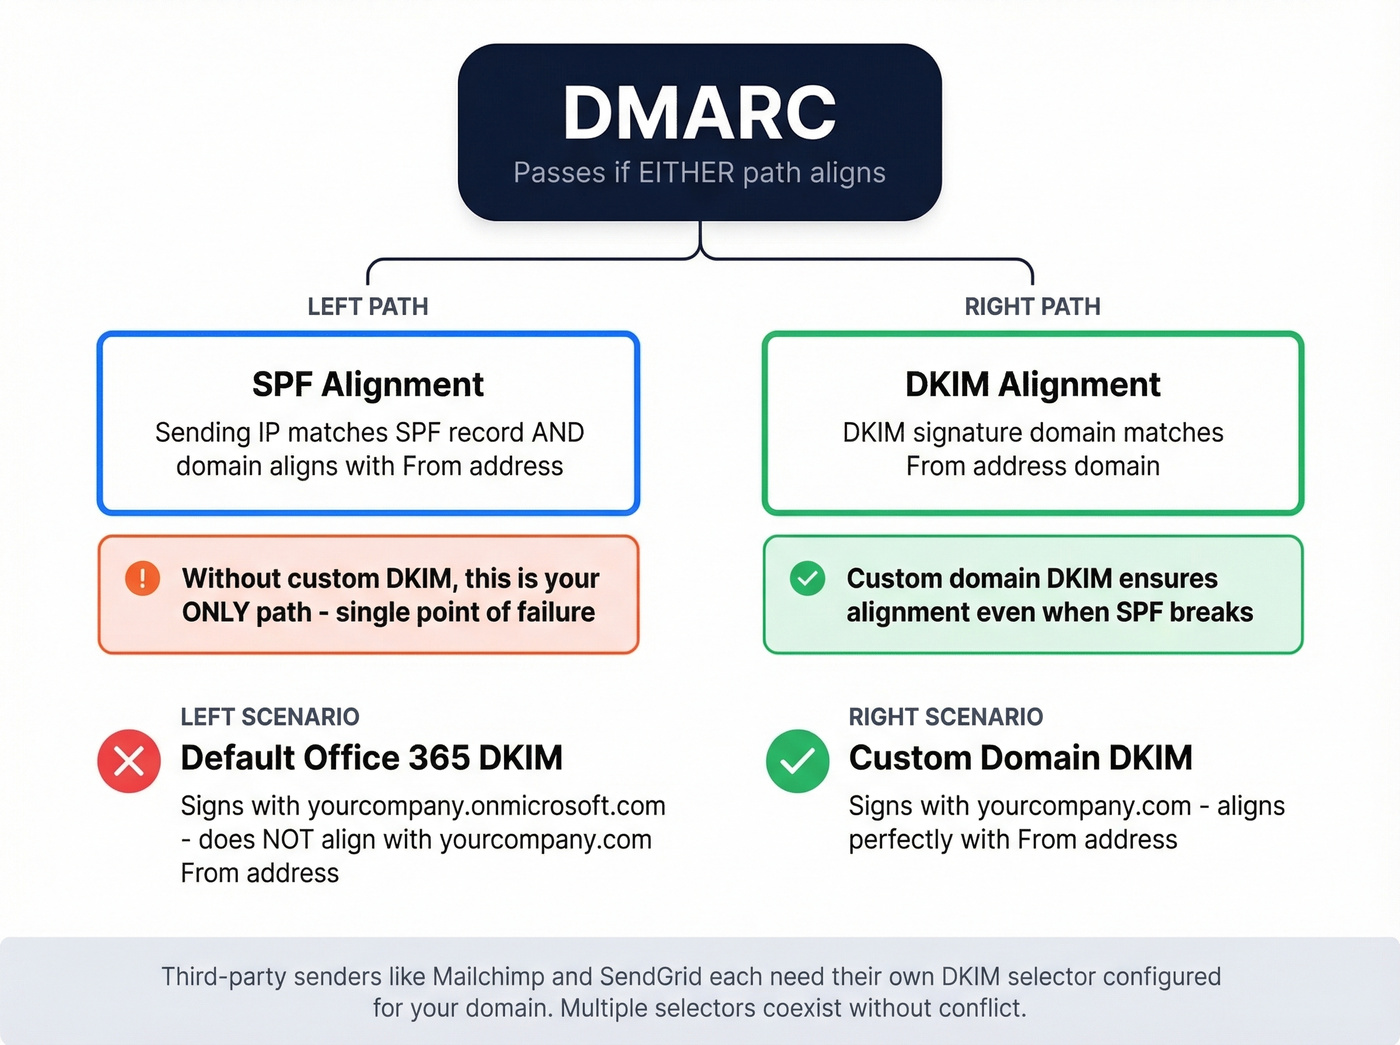
Without custom-domain DKIM, Microsoft signs outbound mail with your .onmicrosoft.com domain. That won't align with your From address, so you're leaning entirely on SPF for DMARC alignment - a single point of failure. This becomes especially dangerous if you use third-party senders like Mailchimp or SendGrid, since each needs its own DKIM selector configured for your domain. Multiple selectors coexist without conflict, so don't worry about stepping on existing records.
If you’re still finalizing your DNS auth set, compare against a clean SPF record example to avoid “looks right but fails” syntax issues.
If you use mail forwarding or mailing lists, look into ARC (Authenticated Received Chain) to preserve authentication through intermediaries.
You're setting up DKIM so your emails don't bounce or land in spam. But authentication only works if you're sending to real addresses. Prospeo's 5-step email verification delivers 98% accuracy with spam-trap and honeypot removal - so your carefully authenticated emails reach actual inboxes, not dead ends.
Don't let bad data undo the deliverability you just built.
PowerShell Setup Method
Single Domain
For scripting or multi-domain automation, PowerShell is faster. The critical thing: you must create the config before you enable it. Skipping this step produces the "object couldn't be found" error that fills half the TechCommunity threads on this topic.
# Step 1: Create the signing config (disabled)
New-DkimSigningConfig -DomainName contoso.com -Enabled $false

# Step 2: Retrieve the CNAME values
Get-DkimSigningConfig -Identity contoso.com | Format-List Selector1CNAME, Selector2CNAME

# Step 3: Publish CNAMEs in DNS, wait for propagation, then enable
Set-DkimSigningConfig -Identity contoso.com -Enabled $true
The New-DkimSigningConfig cmdlet supports -KeySize (including 2048 for stronger keys), -BodyCanonicalization, and -HeaderCanonicalization (both default to Relaxed). For most setups, the defaults are fine.
If you’re diagnosing deliverability issues after auth is “correct,” bounce patterns matter more than people think - see email bounce rate benchmarks and fixes.
Bulk Multi-Domain
If you're managing a dozen domains across client tenants, retrieve all CNAME values at once:
Get-AcceptedDomain | ForEach-Object {
    Get-DkimSigningConfig -Identity $_.Name | Format-List Domain, Selector1CNAME, Selector2CNAME
}

# After publishing all CNAMEs:
Get-AcceptedDomain | ForEach-Object {
    Set-DkimSigningConfig -Identity $_.Name -Enabled $true
}
Troubleshooting: 5 Real Errors
Here's the thing: most DKIM errors in Office 365 aren't DNS problems. They're formatting problems. These are the ones we see over and over.
"CNAME record does not exist"
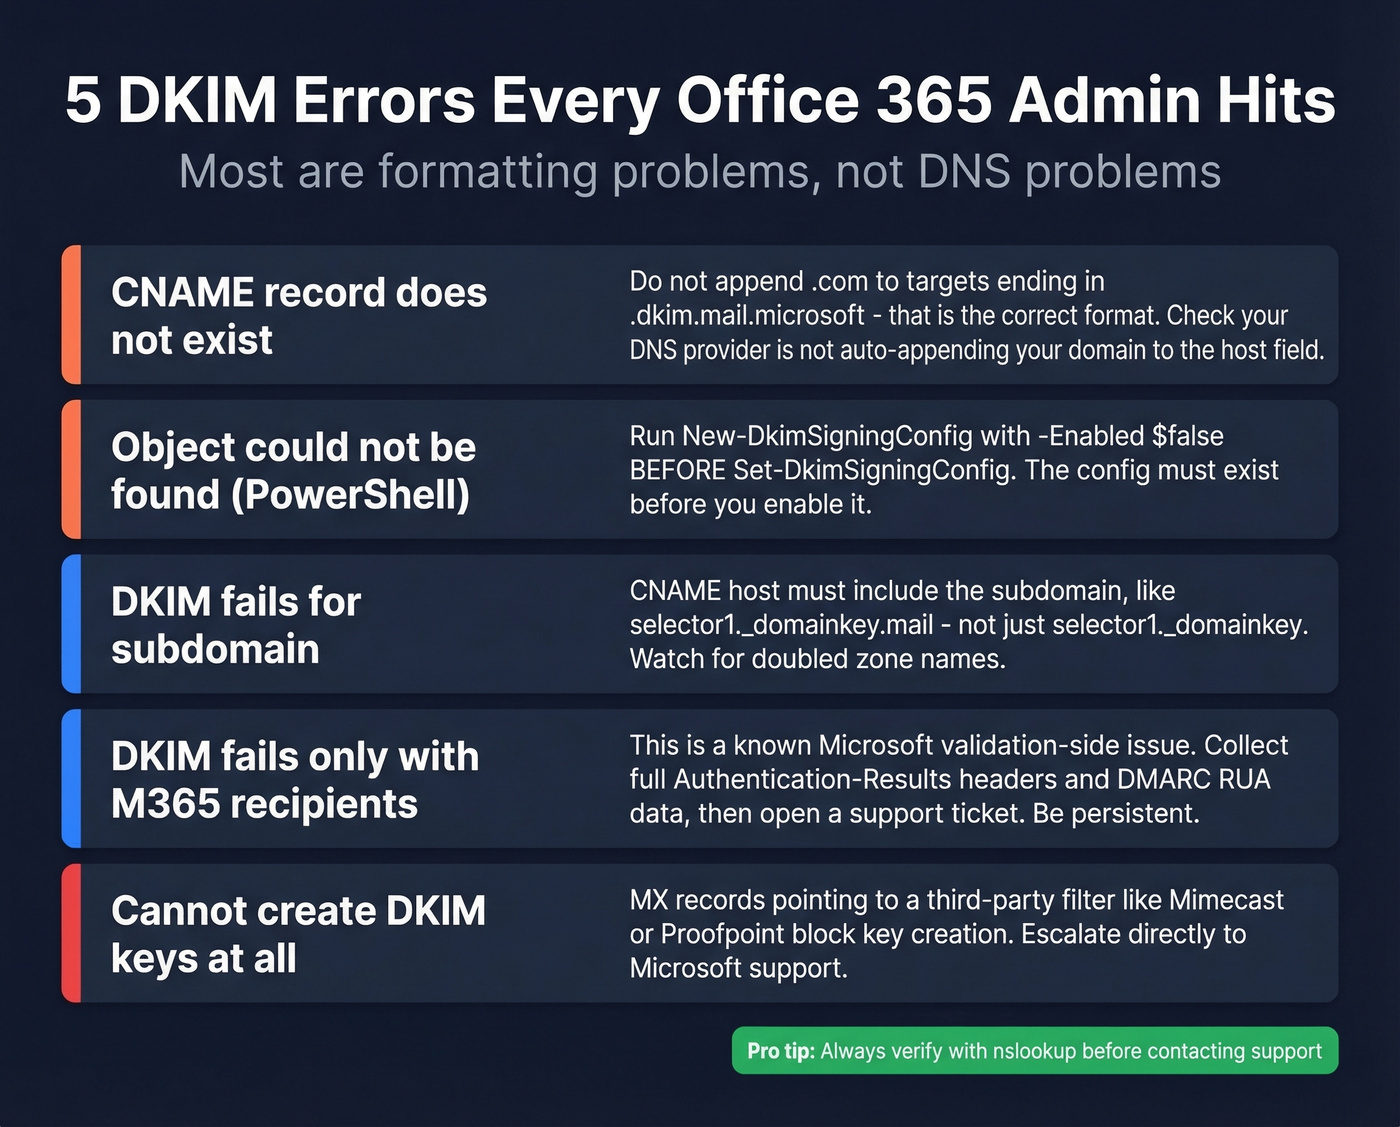
Almost always formatting. If your CNAME target ends in .dkim.mail.microsoft (no .com), don't "fix" it by appending .com. Microsoft's newer format genuinely doesn't end in a public TLD. Also check that your DNS provider isn't auto-appending your domain to the host field, which doubles it into something like selector1._domainkey.contoso.com.contoso.com. That'll fail silently every time.
"Object couldn't be found" in PowerShell
You ran Set-DkimSigningConfig before New-DkimSigningConfig. The signing config doesn't exist yet. Create it first with -Enabled $false, retrieve the CNAMEs, publish them, then enable. The sequence matters - there's no shortcut.
DKIM won't verify for a subdomain
If your sending domain is mail.contoso.com, the selector CNAME host must include the subdomain: selector1._domainkey.mail, not just selector1._domainkey. Watch for DNS providers that auto-append the zone, producing doubled names like selector1._domainkey.mail.contoso.com.contoso.com.
DKIM fails only with M365 recipients
This is a known intermittent issue that's frustrated admins for years. You'll see dkim=fail (no key for signature) and compauth=fail reason=000 in Authentication-Results headers, but only when the recipient is on Microsoft 365. Your DNS is correct, other recipients validate fine, and DMARC aggregate reports show mostly passes with random failures from Microsoft IPs.
There's not much you can fix on your end - this is a validation-side issue on Microsoft's infrastructure. Collect the full Authentication-Results headers plus your DMARC RUA data and open a Microsoft support ticket. Be persistent; first-tier support will try to blame your DNS.
Can't create DKIM keys at all
If your MX records point to a third-party filtering service (Mimecast, Proofpoint, etc.) rather than directly to Microsoft 365, the Defender portal blocks DKIM key creation. Skip the self-service troubleshooting and escalate to Microsoft support directly - this isn't a DNS problem you can solve yourself.
Key Rotation
Microsoft maintains two selectors per domain, but only one is active at any time. When you rotate keys, the inactive selector gets the new key, and Microsoft switches which selector is active as part of the rotation process. Trigger rotation in PowerShell:
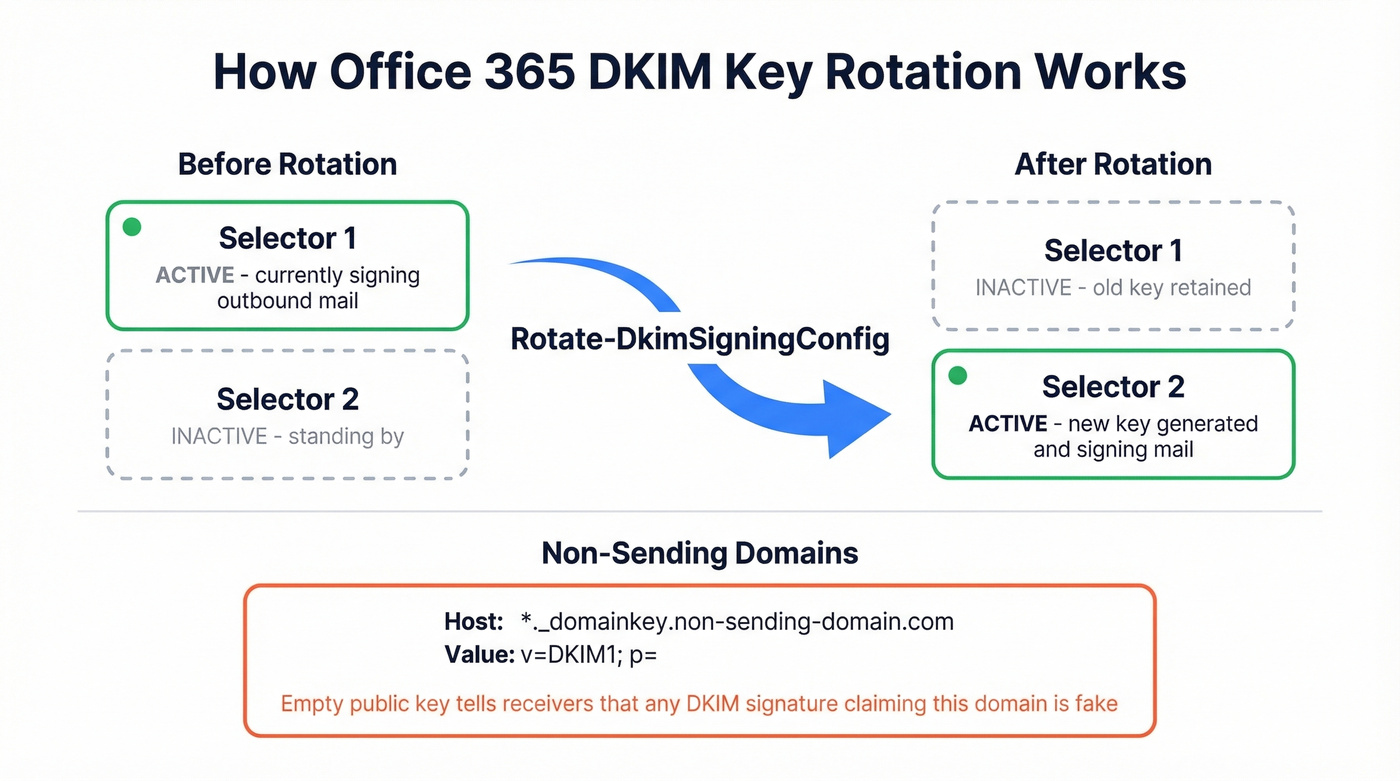
Rotate-DkimSigningConfig -Identity contoso.com
For domains you own but don't send from, publish a wildcard TXT record: *._domainkey.non-sending-domain.com with value v=DKIM1; p= (empty public key). This tells receiving servers that any DKIM signature claiming that domain is illegitimate.
Complete Your Deliverability Stack
Let's be honest: perfect DKIM alignment is table stakes, not a competitive advantage. Every legitimate sender should have it. The thing that actually tanks sender reputation is sending to invalid addresses. High bounce rates damage your standing at Gmail, Outlook, and Yahoo, and no amount of DNS configuration fixes that.
If you’re trying to systematically improve sender reputation, list hygiene and bounce control usually beat more DNS tweaks.
We've seen teams spend hours perfecting their SPF, DKIM, and DMARC records only to watch their first campaign bounce at 12% because their contact list was stale. DKIM protects your domain's identity; verified contact data protects your domain's reputation. Prospeo's 5-step email verification catches invalid addresses, spam traps, and honeypots before they hit your sequences - 98% accuracy with catch-all domain handling built in.
If you’re scaling outbound, pairing verification with an email reputation tools check helps you catch issues early.
Managing DKIM across multiple domains and client tenants? You care about deliverability at scale. Prospeo gives outbound agencies verified contact data with under 3% bounce rates - the same infrastructure Stack Optimize used to hit 94%+ deliverability with zero domain flags.
Pair bulletproof authentication with bulletproof data at $0.01 per email.
FAQ
How do I enable DKIM in Office 365?
Go to security.microsoft.com/dkimv2, select your custom domain, and toggle Enable. Copy the two CNAME records from the error message, publish them in your DNS provider, wait for propagation (typically 2-3 hours), then toggle Enable again. The PowerShell method and bulk-domain steps are covered in the sections above.
How long does DKIM take to activate after publishing CNAMEs?
Most domains activate within 2-3 hours; the upper bound is 48 hours. If Defender still throws errors after that, run nslookup -type=cname selector1._domainkey.yourdomain.com to confirm your CNAME entries resolve correctly before contacting Microsoft support.
Can I use DKIM with a third-party email filtering service?
Yes, but if your MX records don't point to Microsoft 365, the Defender portal blocks key creation. Contact Microsoft support to resolve the block. Once configured, outbound DKIM signing works regardless of inbound MX routing - your filtering service handles inbound, Microsoft handles outbound signing.