MX Record Setup: The Complete 2026 Guide for Every Email Provider
You migrated your website to a new host last Friday. By Monday, half your inbound emails vanished. Nobody told you that changing nameservers means you need to recreate your DNS records at the new provider - including the one record that controls where email actually goes.
That record is the MX record. Get your MX record setup wrong and email silently breaks. Get it right, pair it with proper authentication, and your domain's deliverability is bulletproof.
Quick version: Need the MX values? Jump to the provider-specific section. Email broke after a hosting change? Jump to troubleshooting. Setting up from scratch? Follow top-to-bottom: add MX records, add SPF/DKIM/DMARC, verify with nslookup or MXToolbox.
Why Email Depends on One DNS Record
Every email sent to your domain triggers a DNS lookup. The sending server asks: "Where does mail for this domain go?" The MX record answers that question. Without it, there's literally nowhere for inbound email to land.
This matters more now than it did even two years ago. DMARC adoption hit 53.8% in 2024, up from 42.6% the year before - an 11-point jump driven largely by Gmail and Yahoo's bulk sender requirements mandating authentication for anyone pushing 5,000+ daily emails. Those requirements assume your MX, SPF, DKIM, and DMARC records are all configured correctly. Miss one, and your messages get flagged or your inbound mail disappears entirely.
Configuring mail exchange records isn't complicated. It's just unforgiving of small mistakes.
How MX Records Work
An MX record is a DNS entry that maps your domain to a mail server hostname. When someone emails you@yourdomain.com, their mail server queries DNS for your domain's MX records, gets back one or more hostnames with priority values, and connects to the highest-priority server to deliver the message.
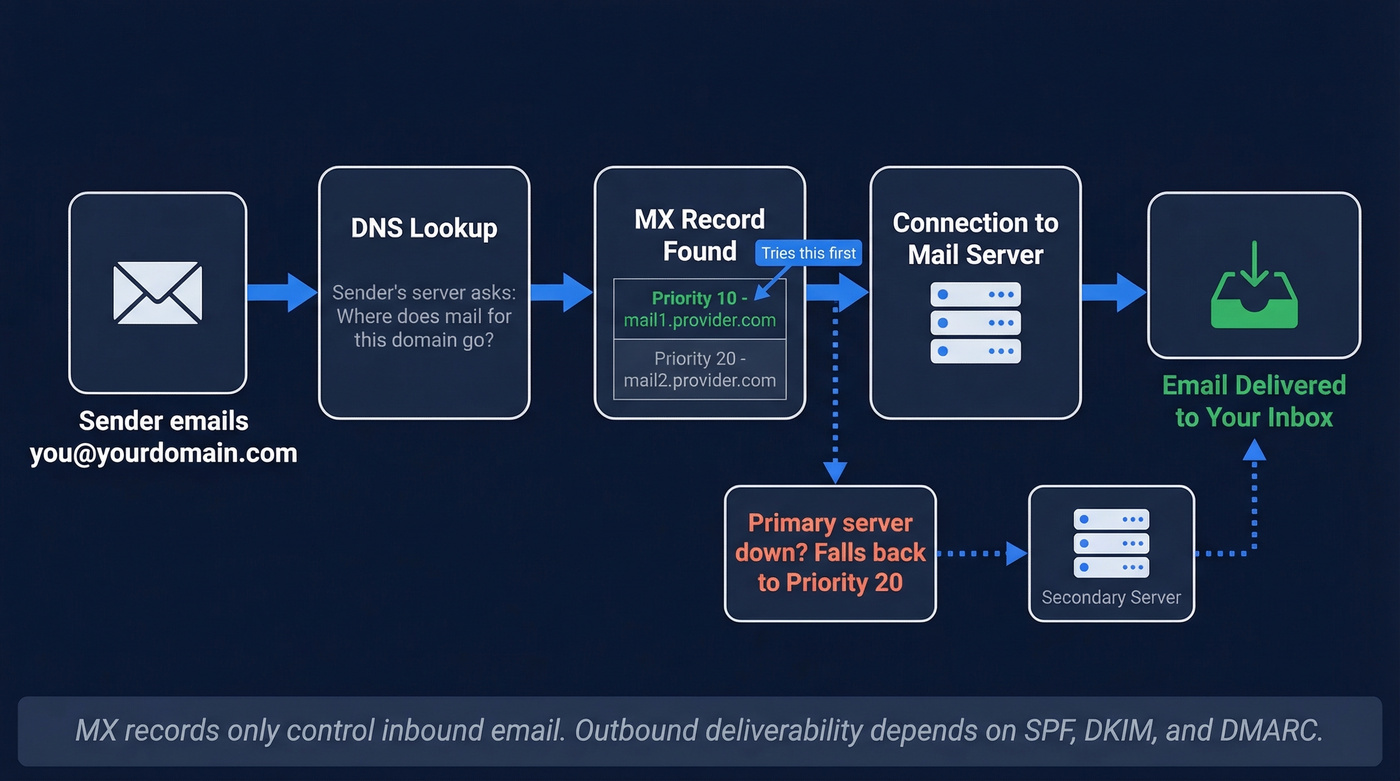
Priority is the key concept. Lower numbers mean higher priority. If you have two MX records - one at priority 10 and another at priority 20 - sending servers try priority 10 first. If that server is unreachable, they fall back to priority 20. The convention is to space priorities in increments of 10, leaving room to insert new records later without renumbering everything.
Two records with identical priority? Sending servers pick randomly between them, creating basic load balancing. That's fine if both servers are configured identically. If they're not - say, one is your old provider and one is your new one - you'll get unpredictable routing and lost mail.
MX records only affect inbound email. They have zero impact on outbound sending. Outbound deliverability is governed by SPF, DKIM, and DMARC, which we'll cover after the setup steps.
If your primary MX server goes down, sending servers don't just give up. Per RFC 5321, they'll queue the message and retry for up to 5 days before bouncing it. One important rule: MX records must not point to a CNAME. They should point to a hostname that resolves via an A or AAAA record.
How to Set Up MX Records: Step-by-Step
Regardless of whether you're using Google Workspace, Microsoft 365, or a self-hosted server, the process follows the same eight steps:
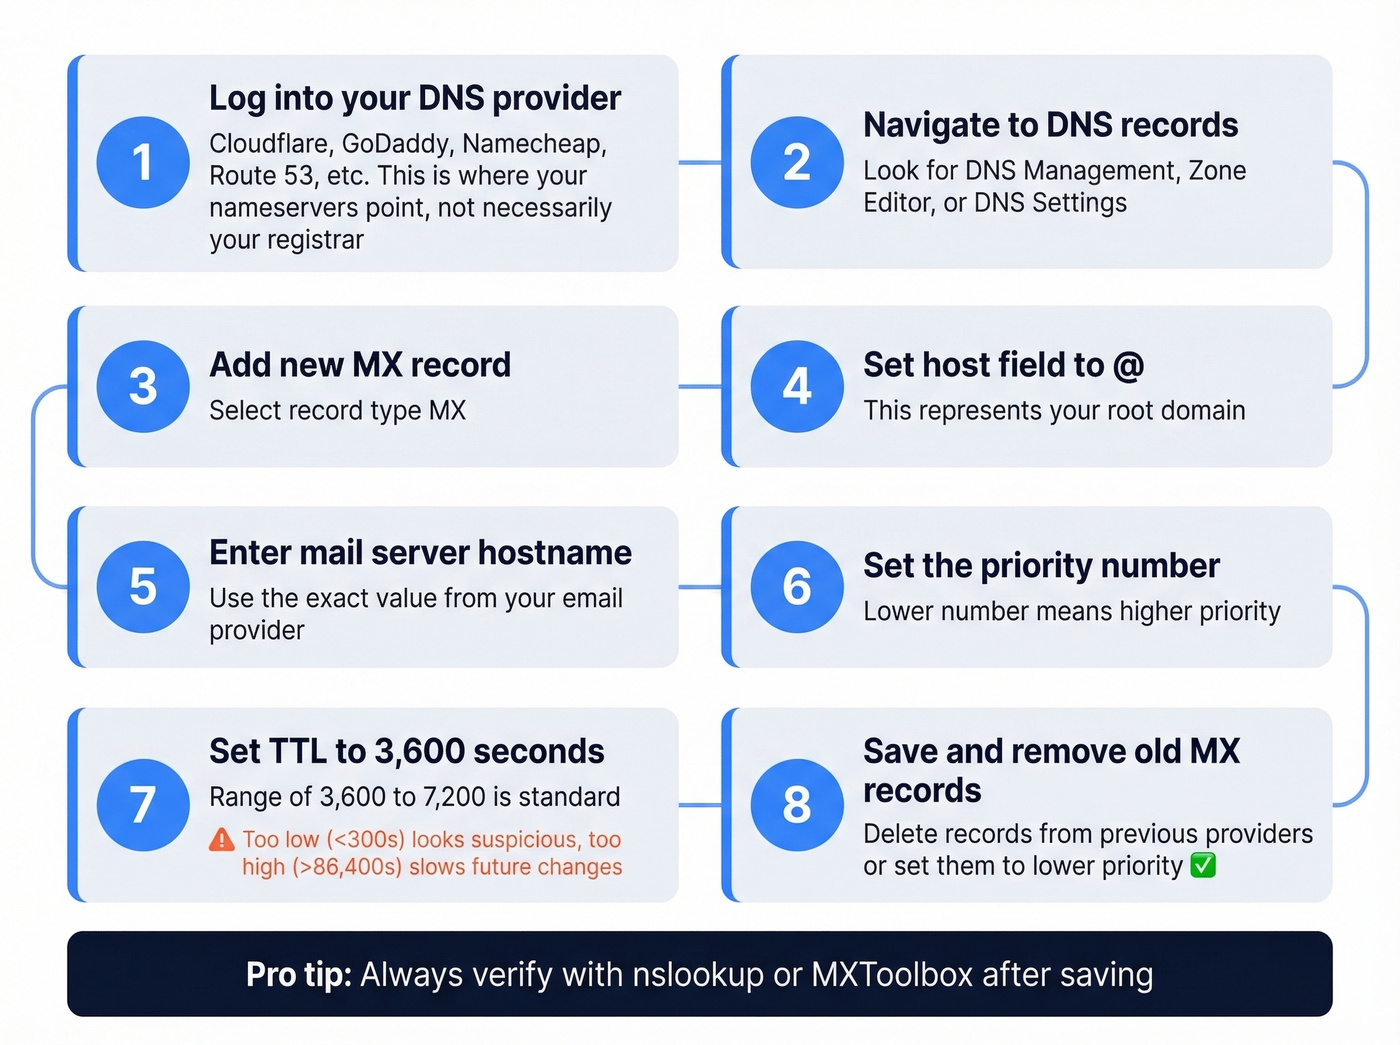
- Log into your DNS provider - wherever your domain's nameservers point, whether that's Cloudflare, GoDaddy, Namecheap, Route 53, or similar. This isn't necessarily your domain registrar.
- Navigate to DNS records - look for "DNS Management," "Zone Editor," or "DNS Settings."
- Add a new record and select type MX.
- Set the host field to
@- this represents your root domain. - Enter the mail server hostname - the exact value depends on your email provider.
- Set the priority - use the value your provider specifies.
- Set TTL to 3,600 seconds. A range of 3,600-7,200 is standard. Too low (<300s) can look suspicious; too high (>86,400s) makes future changes painfully slow.
- Save and remove any old MX records from previous providers, or at least make sure they're lower priority than your current provider.
The specifics change by provider, but the skeleton is always the same.
MX Values by Email Provider
Google Workspace
Google simplified their configuration in April 2023. New accounts only need a single record:

| Host | Value | Priority |
|---|---|---|
| @ | smtp.google.com |
1 |
If your Google Workspace was set up before April 2023, you're likely running the legacy five-record configuration, which still works fine:
| Host | Value | Priority |
|---|---|---|
| @ | ASPMX.L.GOOGLE.COM |
1 |
| @ | ALT1.ASPMX.L.GOOGLE.COM |
5 |
| @ | ALT2.ASPMX.L.GOOGLE.COM |
5 |
| @ | ALT3.ASPMX.L.GOOGLE.COM |
10 |
| @ | ALT4.ASPMX.L.GOOGLE.COM |
10 |
Here's the thing: if your current setup works, don't touch it. Google's admin console will tell you if something needs updating. Switching from the legacy config to the single record mid-operation introduces unnecessary propagation risk. Only change what's broken - or what Google explicitly asks you to update. Both configurations remain valid.
Make sure no conflicting records from a previous provider remain. Google's verification tool flags conflicts even if the MX value itself is correct - a common headache on r/gsuite where users see "MX check failed" despite having the right value, simply because a stale record from an old host is still sitting in their zone file.
Microsoft 365
Microsoft 365 uses a tenant-specific MX hostname. You can't copy someone else's value - it's unique to your domain:
| Host | Value | Priority |
|---|---|---|
| @ | [your-domain-with-dashes].mail.protection.outlook.com |
0 |
Find the exact value in your Microsoft 365 Admin Center under Settings, then Domains.
Add all users and mailboxes in Microsoft 365 before you update your MX records. If you flip MX first, mail arrives at Microsoft with nowhere to go - and it bounces. We've seen this trip up teams during migrations more than almost any other mistake.
Never copy another domain's MX value. Each tenant gets its own endpoint, and using the wrong one breaks delivery silently.
Self-Hosted and Other Providers
For self-hosted mail servers, you need to create an MX record that points to a hostname backed by a valid A record. First create the A record pointing your mail server's hostname to its IP address, then add the MX entry:
| Host | Value | Priority |
|---|---|---|
| @ | mail.yourdomain.com |
10 |
Make sure the A record for mail.yourdomain.com actually exists and resolves to the correct IP. A missing A record is one of the most common causes of "MX looks right but email doesn't work."
If you use Cloudflare, set your mail server's A record to DNS-only mode - the gray cloud icon. Proxying mail traffic through Cloudflare's CDN breaks SMTP connections, and this trips up an enormous number of people who enable the orange cloud on every record by default. The Cloudflare docs on email routing spell this out, but it's easy to miss.
If you're on shared hosting with cPanel, also check Email Routing settings. Switching from "Local" to "Remote" is required when pointing MX to an external provider - skip this and cPanel intercepts mail before it ever reaches your intended server.
For other hosted providers, Zoho typically uses mx.zoho.com at priority 10 and mx2.zoho.com at priority 20. Titan uses mx1.titan.email and mx2.titan.email. Always confirm exact values in your provider's admin panel - they change occasionally.
MX records get mail to your inbox. But what about the emails you send out? Bad contact data destroys the deliverability you just spent hours configuring. Prospeo's 5-step email verification delivers 98% accuracy - so your carefully authenticated domain stays clean.
Don't let bad data undo your perfect DNS setup.
Authentication Records: SPF, DKIM, DMARC
MX gets mail to your server. Authentication records prove your domain is legitimate and your messages aren't spoofed. Skip these and you're leaving deliverability on the table - Gmail and Yahoo's bulk sender requirements drove a 65% reduction in unauthenticated messages. Completing your MX record setup without authentication is only half the job.

SPF (Sender Policy Framework)
SPF tells receiving servers which IPs are authorized to send email for your domain. It's a single TXT record - and you can only have one per domain. Multiple SPF records cause a PermError and break validation entirely.
v=spf1 include:_spf.google.com ~all
For Microsoft 365, replace the include with include:spf.protection.outlook.com. If you use multiple sending services like your email provider plus a marketing tool, combine them into one record:
v=spf1 include:_spf.google.com include:sendgrid.net ~all
Keep your total DNS lookups under 10 - each include triggers at least one. Use ~all (softfail) during initial testing so you don't accidentally block legitimate mail, then tighten to -all once everything's verified.
If you want a deeper walkthrough of syntax, edge cases, and common errors, see our SPF Record guide.
DKIM (DomainKeys Identified Mail)
DKIM adds a cryptographic signature to outgoing messages. Your email provider generates a public/private key pair; you publish the public key in DNS as a TXT or CNAME record depending on the provider.
For Google Workspace, DKIM is commonly published as a TXT record at a selector like:
Host: google._domainkey

Value: v=DKIM1; k=rsa; p=[public-key-from-admin-console]
The exact value is generated in your provider's admin panel - copy it character-for-character. A single missing character in the public key string invalidates the entire signature. Microsoft 365 generates two DKIM CNAME records (selector1 and selector2) that you'll find in the Domains section of your admin center.
If you need help validating selectors and DNS publishing, use our DKIM Record troubleshooting guide.
DMARC
DMARC ties SPF and DKIM together with a policy that tells receiving servers what to do when authentication fails. Start with monitoring:
v=DMARC1; p=none; rua=mailto:dmarc@yourdomain.com
After a few weeks of reviewing reports, move to p=quarantine, then eventually p=reject. This progression - none to quarantine to reject - prevents you from accidentally blocking legitimate mail while you're still tuning your authentication. DMARC.org's deployment guide walks through the reporting analysis in detail.
For a step-by-step rollout plan, see our DMARC Record Setup guide.
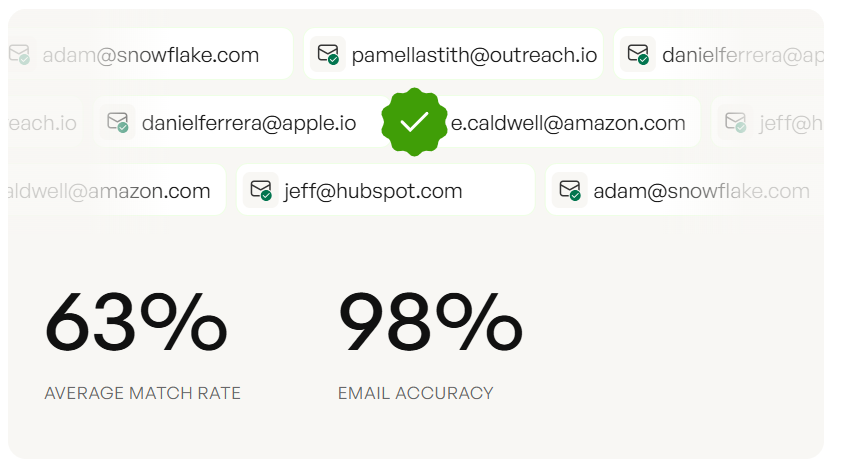
Your DNS records are now configured for both receiving and sending authenticated email. The next deliverability risk isn't technical - it's data quality. Before any outbound campaign, verify your list. Prospeo's 5-step verification process catches invalid addresses, spam traps, and honeypots at 98% accuracy before they damage your sending reputation.
How to Verify Your MX Records
After saving your records, verify they're live. On Windows, open Command Prompt and run:
nslookup
set q=mx
yourdomain.com
You should see output like:
MX preference = 1, mail exchanger = smtp.google.com
On Mac or Linux, use:
dig mx yourdomain.com
The output shows your records with priority values and TTL. If you see the correct hostnames and priorities, you're set.
If you see "No MX records found," either the records haven't propagated yet or they weren't saved correctly. Double-check that you're editing DNS at the correct provider - the one your nameservers actually point to, not necessarily your registrar. We can't stress this enough. It's the single most common mistake we see.
For a browser-based alternative, MXToolbox queries the domain's authoritative nameservers and shows MX records, SPF, DKIM, and DMARC status in one view. For more options, compare our picks for an email deliverability checker.
DNS Propagation: How Long to Wait
Most changes propagate within 4-8 hours. Full global propagation can take 24-48 hours. In rare cases involving ISPs with aggressive caching, it stretches to 72 hours.
You can't force instant propagation. That's a myth. What you can do is lower your TTL to 300 seconds 24-48 hours before a planned migration. This ensures cached records expire quickly once you make the change, dramatically reducing the window where some servers see old values and others see new ones.
After the migration is complete and verified, bump TTL back to 3,600 seconds. There's no reason to keep it low permanently - it just adds unnecessary DNS query load.
Troubleshooting Common MX Issues
Look, most email outages after a hosting migration aren't caused by wrong MX values. They're caused by editing the right values in the wrong place. If you only remember one thing from this section, make it mistake #4.
1. Conflicting records from an old provider. You switched to Google Workspace but left your old host's MX record in place. Now mail randomly routes to both - and half of it lands in a dead mailbox. On r/dns, a user switched from Google Workspace to Rackspace and back, leaving conflicting records that broke verification entirely. Fix: remove all records that don't belong to your current provider before adding new ones.
2. MX pointing to a CNAME. This violates RFC standards and causes silent delivery failures. Mail exchange records must point to an A or AAAA hostname, never a CNAME.
3. Identical priorities causing random routing. Two records at priority 10 - one pointing to your new provider, one to your old - means sending servers pick randomly. That's catastrophic when one server is decommissioned. Use distinct priorities with at least a 10-point gap.
4. Editing records in the wrong DNS zone. You changed nameservers from Namecheap to Cloudflare but kept editing DNS at Namecheap. Those edits do nothing - Cloudflare is now authoritative. This is a recurring thread on r/gsuite: users change hosting providers, edit DNS at their old registrar instead of the new nameserver host, and wonder why email stopped working. Always confirm where your nameservers point before touching DNS records. If you need a quick way to confirm ownership and DNS control, see our domain verification guide.
5. Missing A record for the mail server hostname. Your MX points to mail.yourdomain.com, but there's no A record resolving that hostname to an IP. The sending server finds your MX, tries to connect, and fails.
6. Skipping authentication records. MX alone gets mail delivered to your server. Without SPF, DKIM, and DMARC, your outbound mail gets flagged as suspicious and your domain becomes a spoofing target. These aren't optional anymore. If you're diagnosing broader issues, use our guide to email deliverability issues.
Migration Checklist
Switching email providers is where most MX disasters happen. Follow this sequence.
Before the switch:
- Back up all existing email from your current provider
- Add all users and mailboxes at the new provider
- Lower TTL to 300 seconds and wait 24-48 hours
During the switch:
- Remove old provider's MX records or set them to a lower priority than your new provider
- Add new provider's MX records with correct priorities
- Update SPF to include the new provider and remove old includes
- Add new DKIM records from the new provider
- Update DMARC if the reporting address changed
After the switch:
- Verify with
nslookupor MXToolbox - Send test emails from external accounts to confirm delivery
- Monitor for 48 hours, then restore TTL to 3,600 seconds
For Microsoft 365 specifically: always add users and mailboxes first, then update MX. Flip that order and you'll bounce inbound mail during the entire transition window. We've watched teams lose a full day of email this way - it's not a theoretical risk.
If you're also changing your outbound stack, it helps to follow a structured email domain setup checklist.
You're protecting inbound deliverability with SPF, DKIM, and DMARC. Protect your outbound reputation too. Prospeo verifies every email against catch-all domains, spam traps, and honeypots - refreshed every 7 days, not the 6-week industry average.
Keep your bounce rate under 4% like 15,000+ teams already do.
FAQ
How long do MX record changes take to propagate?
Most changes take effect within 4-8 hours, with full global propagation completing in 24-48 hours. Lower your TTL to 300 seconds a day or two beforehand to minimize the transition window where different servers see different values.
Can I have multiple MX records?
Yes, and it's recommended for redundancy. Assign different priority values to each - sending servers try the lowest number first and automatically fail over to higher-priority entries if the primary is unreachable.
Do MX records affect outbound email?
No. MX records only control inbound delivery routing. Outbound deliverability depends on SPF, DKIM, and DMARC configuration, plus your sending server's IP reputation and list hygiene.
What's the best way to verify email lists after MX record setup?
Use a dedicated verification tool before launching outbound campaigns. Prospeo's 5-step verification catches invalid addresses, catch-all domains, spam traps, and honeypots at 98% accuracy - preventing bounces that damage the sender reputation you just finished configuring.
Do I need a backup MX with Google Workspace or Microsoft 365?
No. Skip this if you're on either platform. Adding a third-party backup MX introduces risk - if the backup server has weaker spam filtering, attackers target it directly, bypassing your primary provider's security stack entirely.